So the day’s cake making mission has finally finished! This making of the celebration cake went so much better than my first one and that was all thanks to my new present – a hand mixer!
My bf’s mum bought this for me a few weeks ago and I can’t thank her enough! It made this cake making sooooo much easier and I can now whisk egg whites without getting arm ache! By using this I could bring the mixture together in about 10 mins which was great.
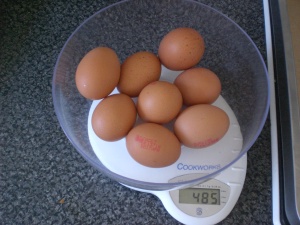
I started by weighing out 8 eggs…
I then used an equal amount of sugar, margarine and self raising flour and basically mixed it all together. I made three layers so I got through A LOT of ingredients! Here is my method in pictures….
As you can see, it was quite a basic batter with a little twist…….a bit of vanilla extract! I added in a capful of this when the flour had been incorporated. I think it subtly added to the cake and it smelt amazing when it was cooking!
I then whisked the mixture for another 5 mins or so until it was light yellow in colour and was full of air. I then poured it into the MASSIVE roasting tin that I was using and smoothed the top.
I wasn’t sure how long to cook it for as it obviously wasn’t a regular sized cake. I decided to cook it for 30 mins at about 190C/Gas Mark 5, rotating halfway, and then check it. Surprisingly it was quite cooked by then. I left it in for another 5 mins just to make sure it was cooked and then took it out. It cooked very evenly and didn’t rise too much in the middle. The edges are a little burnt but I am going to cut them off tomorrow when I ice it. (my bf is so looking forward to eating them!)
I did made another 2 layers after this and the whole process took about 2 + half hours – not too bad. Our little kitchen was boiling hot afterwards and we had to fling open the windows in the kitchen and living room to cool down!
To get the lining off the bottom of the cakes I had to flip the layers onto a chopping board otherwise they would have broken in half! Our living room table was covered in cake crumbs after that! At the moment all three layers are sitting on my big square cake board on top of our oven, ready to be iced tomorrow. I’ve sandwiched the layers with baking paper for the moment and covered the whole board in clingfilm.
Please come back soon for Part 2 – the icing of the cake (I am soooo scared about this!)


2 comments
Comments feed for this article
April 19, 2010 at 9:26 am
thirtyandhealthy
Good job so far! I don’t think I’d have a mixing bowl big enough to coke with all that cake batter 🙂 Did you get the price sorted?
April 22, 2010 at 10:39 am
healthyamy
The cake looks yummy already…i’m heading over to part 2 to see how it looks now!